The “Getting started” assistant
The “Getting started” assistant sets up a project with unknown lights in six short steps: check your lights, lay out your setup, gobos, a test on the real rig and your first show.
Step by step
- Step “Hello”: The assistant shows which lights it found and points out anything special (several venues, fixtures on universe 2, sparks and haze). Tap “Let’s go”.
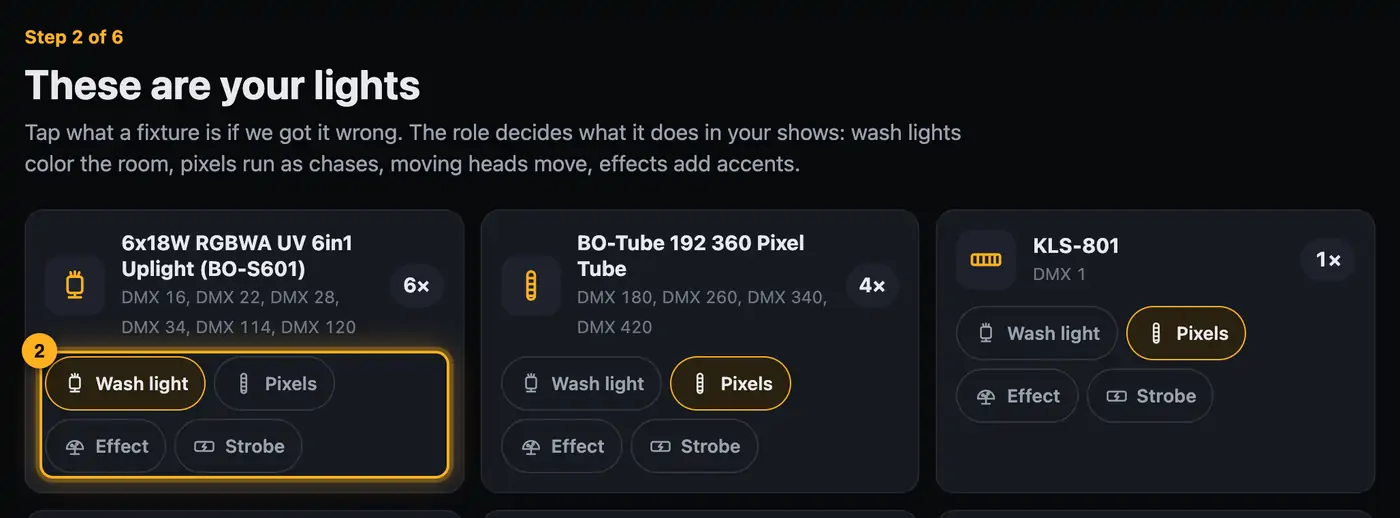
- Step “Your lights”: Check the role of each fixture: “Wash light”, “Pixels”, “Moving head”, “Effect” or “Strobe”. If a fixture does several things (e.g. a lighting bar with pars, derbys and a laser), each part gets its own role.
- If fixtures are on universe 2, answer the question about it: “Yes, they really exist” or “No, they’re spares”.
- Step “Setup”: Choose the template that fits best: “Compact at the booth”, “Booth + two stands” or “Truss above the booth”. You see the setup from the front, just like your guests.
- Tap a light and choose under “Stands on …” what it stands on, or “Remove light” if you don't bring it.
- Dragging moves a light, dropping it on another light swaps them. “Swap left ↔ right” mirrors the setup.
- “Redistribute” puts all lights back on the template's spots. Moving, swapping and mirroring are undone, removed lights stay removed.
- “View in 3D visualizer” shows the setup in 3D.
- If you have a preset in the 3D visualizer whose lights are all patched here, it shows up as the first card “Use your preset “…”” and is already selected. The front view shows the setup from the preset with all its objects, including mirror ball, Humpter or column speakers. You can't move lights here: “Change in 3D setup” takes you to the 3D setup for that. If you're setting up differently today, pick a template.
- Your lights are set up differently (other height, a second truss, your own spacing)? Tap “Place exactly in 3D setup”. In the 3D setup you drag each light freely to its spot. “Back to Getting started” brings you back here.
- If you already have your own 3D setup, this step says “Your own 3D setup is used” (with a preset: “Your preset “…” is used”). “Next” confirms it without changing anything. “Use a template instead” replaces it.
- Step “Gobos”: The assistant looks for matching fixture profiles for your moving heads. “Use all safe matches” selects every result marked “sure match”, and you switch single ones on or off with the switch in their row.
- Step “Test”: Tap “Save test loop to SoundSwitch”. Then open the project “<project> Show-Designer” in SoundSwitch, tap Edit at the top, “A” at the bottom right, choose the bank and start the loop “Setup test” with Space. Then answer “How did it go?”.
- If all Autoloop slots are taken, the assistant replaces one loop in the copy. You choose which one above the save button under “Replace:”. The last loop of the last bank is preselected. Your original stays unchanged. After saving, it says there which loop the test replaced.
- Step “First show”: Tap a mood. The preview shows 8 bars. “Save to SoundSwitch” puts the show as an Autoloop in the first free slot.
- If no slot is free, you also choose here under “Replace:” which loop in the copy gets replaced. If the test loop replaced a loop in step 5, that slot is preselected.
- Finally, under “Save as first profile”, enter a name for the setup and your own name and tap “Save as first profile”. “Go to overview” takes you to your banks.
- If you used your preset in step 3, you see “Linked to your preset” here instead. You don't need a second profile then.
Good to know
- “Set up later” at the top right closes the assistant. It then won't open by itself again for this project.
- Use “Back” or tap a finished step at the top to go back.
- If your project has several venues, the assistant tells you which venue tab to choose in SoundSwitch.
- “Next” in step 2 saves the roles. “Next” in step 3 saves the template as your 3D setup and marks the lights as checked. It doesn't overwrite a setup you built or changed yourself in the 3D setup. With a preset selected, “Next” saves the setup from the preset: the 3D visualizer then shows “✓ Loaded” and picks up later versions of the preset by itself.
- Removed lights are listed under “Not in the setup”. “Bring back” adds them again. Shows and the visualizer leave them out.
- Gobos and the test are optional. Your shows work without a fixture profile, and “Continue without test” skips the test.
- The first save creates the copy “<project> Show-Designer”. Your original stays untouched.
- The profile at the end goes into the 3D visualizer under Presets → “by <your name>”. That way you load the setup with one click at your next gig.
Questions
In the Overview at the bottom left under “Your rig”, tap “Getting started”.
The templates have fixed spots. In step 3, “Place exactly in 3D setup” takes you to the 3D setup. There you put each light freely in its real place and adjust truss and stands. Then continue with “Back to Getting started”, and your setup stays as it is.
In the 3D visualizer there's a preset whose lights are all patched in this project. If you use it, your setup is exactly as in the preset, and the project stays linked to the preset. Fixtures from the preset that are only parked here stay dark and are listed under “Parked here, stay dark: …”.
For that there's the “Roles & order” button in the Overview under “Your rig”.
Tap “A row ran the wrong way”. The assistant goes back to “Your setup”. Swap lights there or mirror with “Swap left ↔ right”.
Check the DMX address and channel mode on the fixture. If it's on universe 2, answer the question in step 2 with “Yes, they really exist”.
If something goes wrong
- “No lights are patched in this project – choose another project at the top.”: The project has no lights. Open the project with your patch.
- “Please answer the question about universe 2 above.”: You can't continue without an answer. Tap one of the two answers.
- “This project has no Autoloop bank yet – create one in SoundSwitch.”: The assistant finds no Autoloop bank at all in your project. Create one in SoundSwitch and open the project again. If all slots are merely taken, you won’t see this message: the assistant replaces a loop in the copy instead (see step 5).
- “Please enter your name – that’s where you’ll find your profiles”: Enter a name in the “Your name” field.
More from “Getting started”
- What is Droplit?Droplit builds light shows for SoundSwitch without programming effect after effect. You pick a slot, a mood and colors. Droplit turns that into a show for exactly your lights and saves it to your SoundSwitch project.free to read
- What you needFor Droplit you need a SoundSwitch project with your lights.free to read
- Getting started in the web versionThe web version runs in Chrome or Edge and needs a free account. Once it's set up, you're in your project with a few clicks.free to read
- Sharing your SoundSwitch folder or a projectIn the web version, the designer works directly with your SoundSwitch projects. To do that, you share them with the browser once: either the whole folder with your projects or just a single project. Nothing gets uploaded.free to read
- Opening and switching projectsOn the start page you choose the SoundSwitch project you want to design. After that you see your lights, banks and songs in the Overview.free to read