
Control One recreated
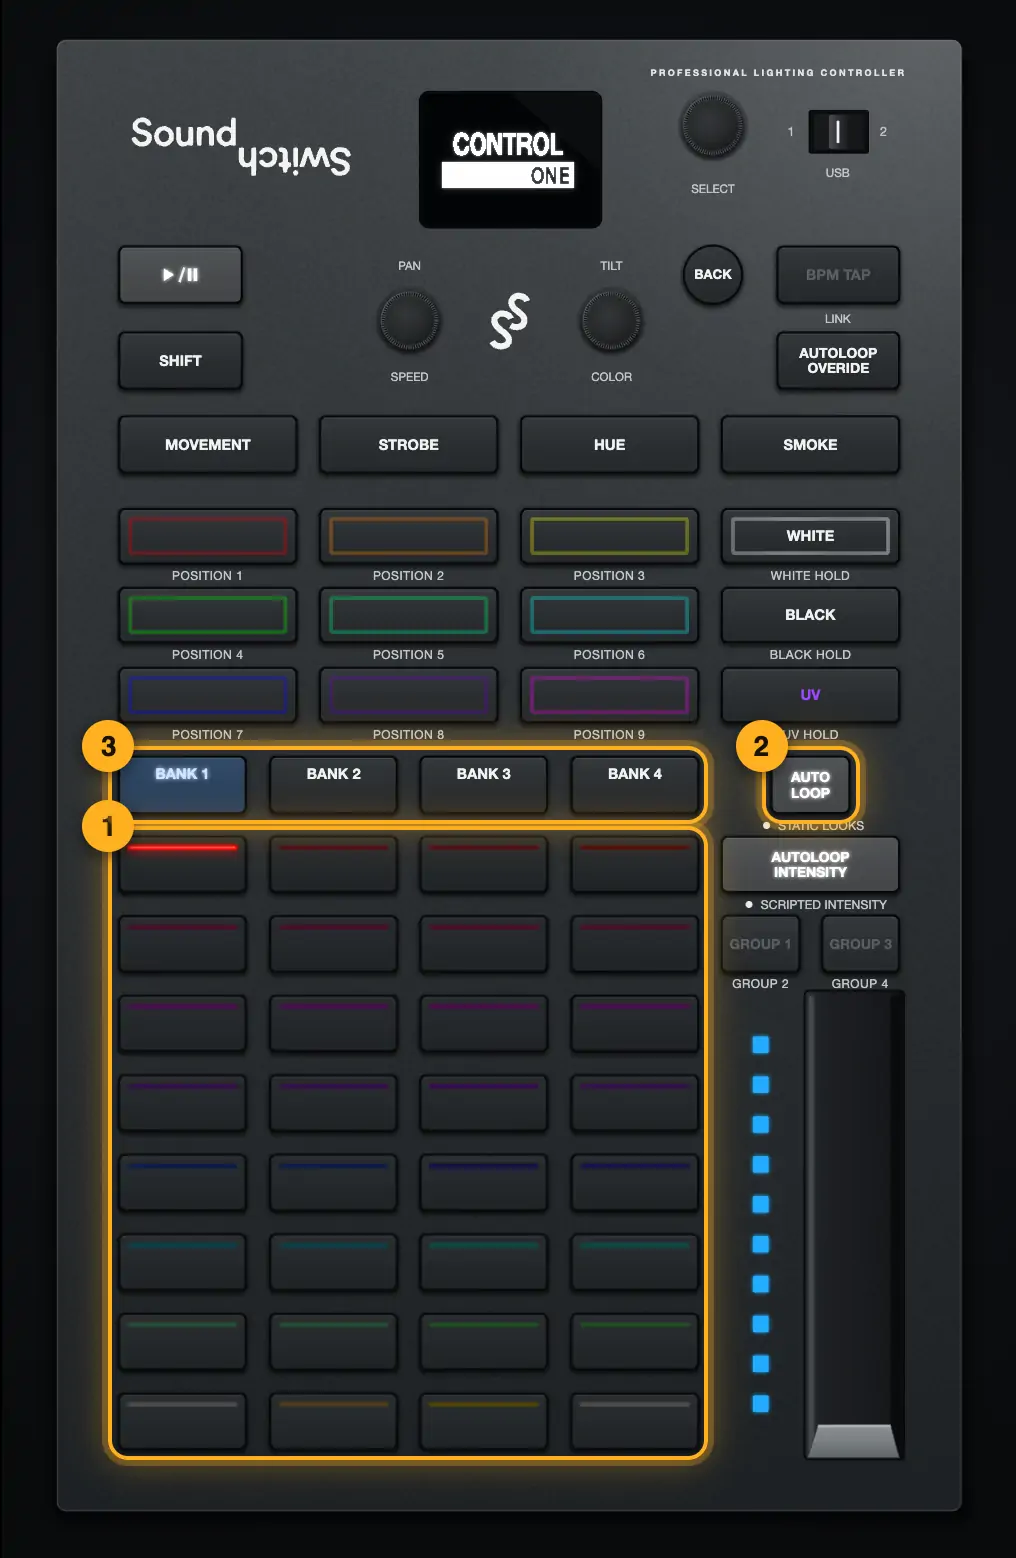
The “Control One” layout shows the SoundSwitch Control One the way it sits on your desk: upright to the right of the stage, button for button from the manufacturer’s photo. Like on the real unit, the pads carry no names. They only light up in their color.
Step by step
- The 32 pads (4 columns of 8) are the slots of the selected bank. Slots 1–8 are the left column from the top, like in SoundSwitch. A pad with a show glows dimly, the one playing glows bright. Empty pads stay dark.
- “AUTO LOOP” switches the pads between Autoloops and static looks. If a look is still on in the background, the button blinks.
- “BANK 1” to “BANK 4” pick the bank. A long press (or right-click) plays only that bank, “SHIFT” plus bank plays all of them again. Selected bank white, bank with the playing loop blue, exclusive bank red.
- The 9 color buttons set a fixed color, press again to remove it. With “SHIFT” they are “POSITION 1” to “POSITION 9”, the positions of your moving heads. The button of the active position blinks white and in its color.
- “WHITE”, “BLACK” and “UV” work the way they are set in SoundSwitch (hold or toggle). With “SHIFT” they latch (“HOLD”).
- “MOVEMENT”, “STROBE”, “HUE” and “SMOKE” switch the effect (smoke only while pressed). The display shows the values. “SHIFT” plus effect only shows the values.
- Knobs “SPEED” (left) and “COLOR” (right): speed of movement and strobe, or a fixed color from the color wheel. After “MOVEMENT” they set the movement’s rate and size. With “SHIFT” they are “PAN” and “TILT”: all moving heads move. Turn them by dragging, with the mouse wheel or the arrow keys.
- Touch strip on the right: touching the strip sets the Autoloop brightness, the 10 blue LEDs show the value. Double-click the strip to set 100 %. “AUTOLOOP INTENSITY” switches to the brightness of song shows (scripted, the button blinks), press again to go back. “GROUP 1” switches to group 1 (button lit), again to group 2 (button blinks), a third time back. “GROUP 3” works the same for groups 3 and 4.
- “▶/II” starts or pauses the light show, “SHIFT” plus “▶/II” resets the downbeat. Tap “BPM TAP” in time. “SHIFT” plus “BPM TAP” switches LINK; only the button and the display show it. The beat keeps coming from live mode. “AUTOLOOP OVERIDE” keeps Autoloops running even for songs with a light show.
- Pressing “SELECT” opens the “HOME” menu. Turning scrolls, pressing selects, “BACK” goes back.
- “EFFECTS”: MOVEMENT, STROBE or HUE. The display shows the effect’s values, the knobs set them.
- “OVERRIDES”: NEXT AUTOLOOP, PREV AUTOLOOP and REPEAT AUTOLOOP.
- “SETTINGS”: DMX SETTINGS (USB or THRU), MIRROR UNIVERSE (OFF or ON) and INFO with the firmware. These are settings of the real unit. They have no effect in the preview.
More from “Live mode”
- Opening live modeLive mode plays all Autoloops, static looks and song shows of your project on the 3D stage, and you control them the way you do on the night: on the computer, on the PRIME 4 or on the Control One. That way you see how your shows work together before the gig.Summary
- Live Desk: control your show while you DJThe Live Desk is your own MIDI surface for SoundSwitch: on your computer, tablet and phone. It comes mapped to your show, with the names and colors of your loops and looks. There is nothing to learn or map.Summary
- Spot Director: guide your movers from your phone on the nightWith Spot Director you guide your moving heads from your phone or tablet during the event. Tap the floor and all selected heads go there together. Drag your finger and they follow the couple across the dance floor.Summary
- Choosing the controls: Perform, PRIME 4, Control One, StageAt the top of live mode you choose what the controls look like. Each layout recreates a device, so you pick your shows the same way you do on the night.Summary
- Playing Autoloops and static looks liveIn the “Perform” layout you see SoundSwitch 2.11 in Performance mode, just like on your laptop after clicking “MIDI”: the same tabs, buttons, colors and spacing. You play Autoloops and static looks there just as on the night.Summary